HISTORICAL · DECIMAL · FOUR FINGER GROUPS

Medieval European Finger Counting

Computus digitorum · Bede’s arrangement

Human hands become a compact number display: the left carries units and tens, the right hundreds and thousands.

Convert numbers
Place
Northumbria, England; wider Latin manuscript tradition
Period / variant
725 CE; ancient precedents and later medieval variants
EXAMPLES

54 · Decimal · four finger groups

Left thumb angled inward for 50, with ring and middle fingers folded for 4.

Worked example

Show 54 in Medieval European Finger Counting

Bede assigns a separate finger group to each decimal place. The original woodcut illustrates those groups separately; combine them on the signer’s left and right hands.

  1. On the left hand, make 50 with thumb and index: Bend the outer thumb joint into an angle and incline the thumb toward the palm. Make 4 with the outer fingers: Raise the little finger; keep the ring and middle fingers folded to the middle of the palm.

  2. Hold the finger groups together and add their contributions.

Check

5 × 10 + 4 = 54

Sources and notation notes

Finger numerals — 1520 woodcut chart · Bede — De temporum ratione, chapter 1 (725)

Hand gesture dictionary

These are the original illustrations and printed numbers from a public-domain chart based on a 1520 woodcut. Each pose shows one place-value group. Combine the groups on each hand; left and right refer to the signer.
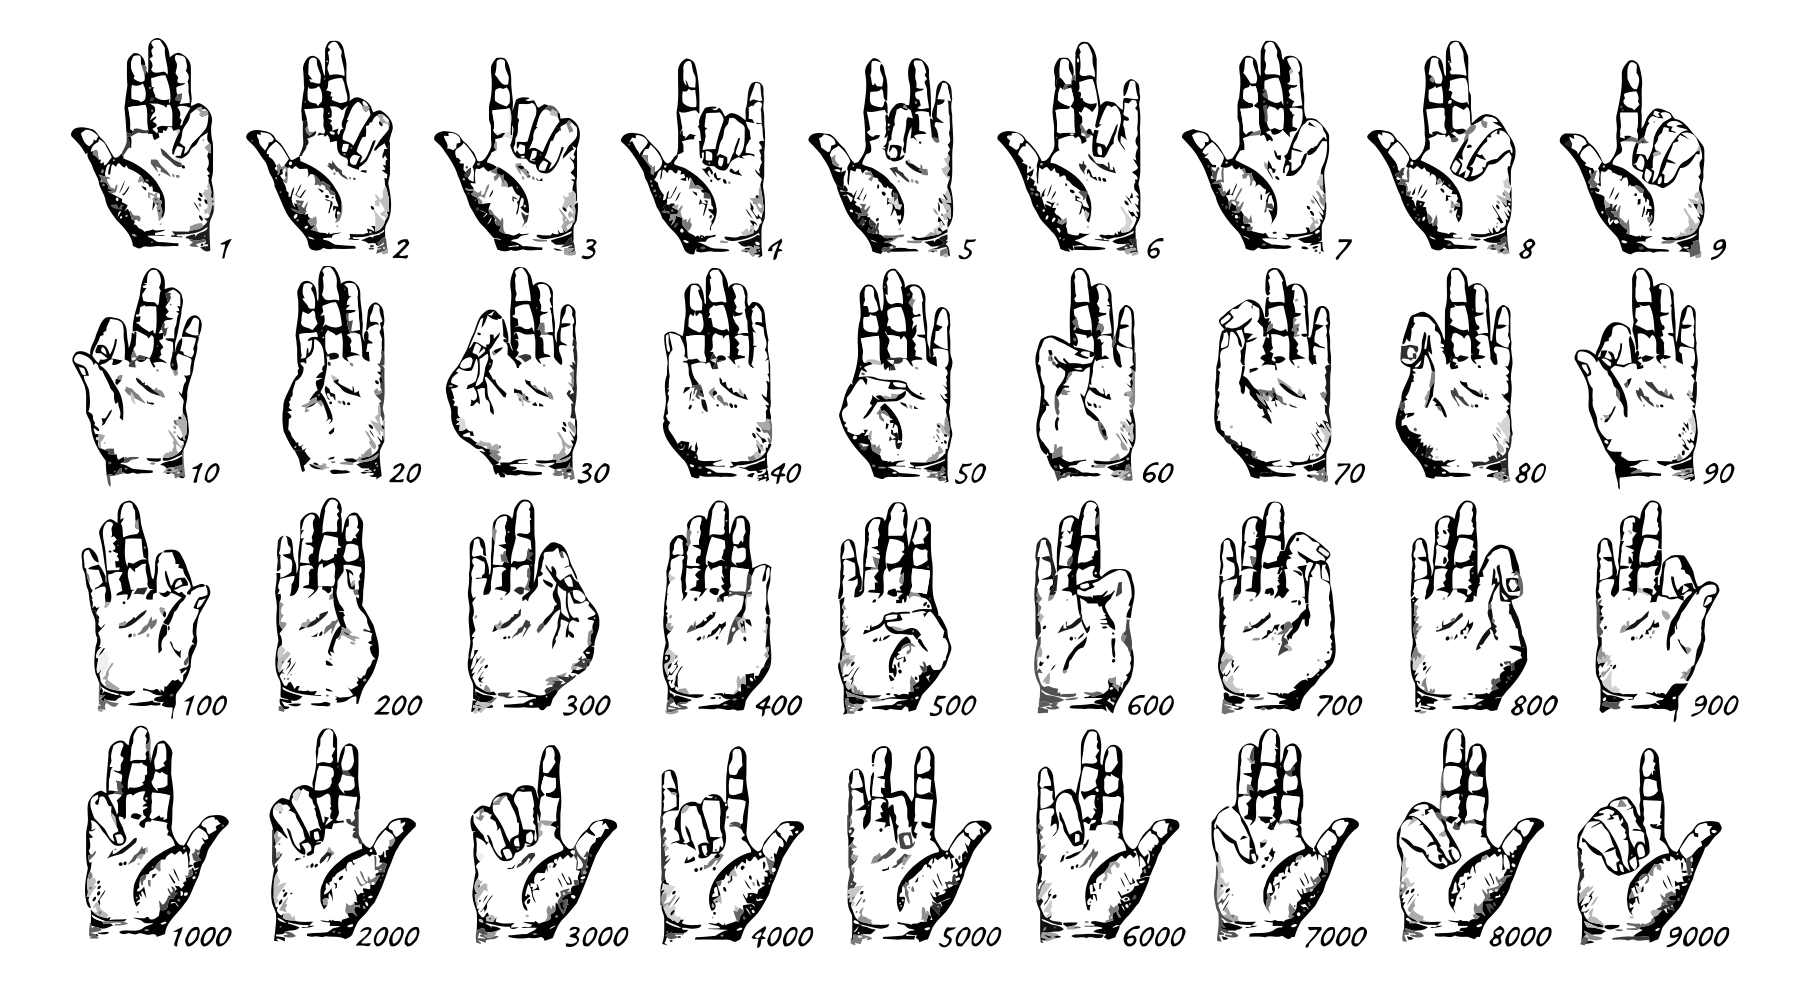
  • 1 · left outer fingers. Fold the little finger so its tip touches the middle of the palm.
  • 2 · left outer fingers. Fold the little and ring fingers to the middle of the palm.
  • 3 · left outer fingers. Fold the little, ring, and middle fingers to the middle of the palm.
  • 4 · left outer fingers. Raise the little finger; keep the ring and middle fingers folded to the middle of the palm.
  • 5 · left outer fingers. Keep only the middle finger folded to the middle of the palm.
  • 6 · left outer fingers. Keep only the ring finger folded to the middle of the palm.
  • 7 · left outer fingers. Fold only the little finger farther down, to the base of the palm.
  • 8 · left outer fingers. Fold the little and ring fingers to the base of the palm.
  • 9 · left outer fingers. Fold the little, ring, and middle fingers to the base of the palm.
  • 10 · left thumb/index. Touch the index fingernail to the middle joint of the thumb.
  • 20 · left thumb/index. Insert the thumb tip between the middle joints of the index and middle fingers.
  • 30 · left thumb/index. Join the tips of the thumb and index finger in a rounded embrace.
  • 40 · left thumb/index. Pass the inside of the thumb across the side or back of the upright index finger.
  • 50 · left thumb/index. Bend the outer thumb joint into an angle and incline the thumb toward the palm.
  • 60 · left thumb/index. Curve the index finger around the bent thumb.
  • 70 · left thumb/index. Place the thumb inside the curved index finger, with the thumbnail projecting across its middle joint.
  • 80 · left thumb/index. Stretch the thumb inside the curved index, pressing its tip to the index finger’s middle joint.
  • 90 · left thumb/index. Press the bent index fingernail against the base of the upright thumb.
  • 100 · right thumb/index: repeat the left-hand 10 shape.
  • 200 · right thumb/index: repeat the left-hand 20 shape.
  • 300 · right thumb/index: repeat the left-hand 30 shape.
  • 400 · right thumb/index: repeat the left-hand 40 shape.
  • 500 · right thumb/index: repeat the left-hand 50 shape.
  • 600 · right thumb/index: repeat the left-hand 60 shape.
  • 700 · right thumb/index: repeat the left-hand 70 shape.
  • 800 · right thumb/index: repeat the left-hand 80 shape.
  • 900 · right thumb/index: repeat the left-hand 90 shape.
  • 1000 · right outer fingers: repeat the left-hand 1 shape.
  • 2000 · right outer fingers: repeat the left-hand 2 shape.
  • 3000 · right outer fingers: repeat the left-hand 3 shape.
  • 4000 · right outer fingers: repeat the left-hand 4 shape.
  • 5000 · right outer fingers: repeat the left-hand 5 shape.
  • 6000 · right outer fingers: repeat the left-hand 6 shape.
  • 7000 · right outer fingers: repeat the left-hand 7 shape.
  • 8000 · right outer fingers: repeat the left-hand 8 shape.
  • 9000 · right outer fingers: repeat the left-hand 9 shape.
View the complete original woodcut chart
Original 1520 finger-counting woodcut chart, with illustrated poses for 1–9, 10–90, 100–900 and 1,000–9,000
1520 woodcut chart · public domain · Wikimedia Commons

How the gestures fit together

The little, ring, and middle fingers on the left encode 1–9; its thumb and index encode 10–90. On the right, the thumb and index repeat the tens shapes for 100–900, while the other three fingers repeat the units shapes for 1,000–9,000. Combine the groups simultaneously. The 1520 woodcut shows each place-value group separately. Left and right refer to the signer; combine the groups on each hand.

  1. Identify the signer’s left hand: its three outer fingers supply units, and its thumb/index supply tens.
  2. Distinguish fingertips touching the middle of the palm (1–6) from the base of the palm (7–9).
  3. Read the right thumb/index as hundreds and the right outer fingers as thousands. This is Bede’s ordering.
  4. Add the four contributions. For 1,254: right hand 1,000 + 200, left hand 50 + 4.

6 in Medieval European Finger Counting

The left ring finger alone touches the middle of the palm; six is a learned configuration, not six extended fingers.

54 in Medieval European Finger Counting

Left thumb angled inward for 50, with ring and middle fingers folded for 4.

100 in Medieval European Finger Counting

Use the left-hand shape for 10 on the right thumb and index.

1254 in Medieval European Finger Counting

Right: 1,000 + 200. Left: 50 + 4. Hold both hands together.

The illustrations are copied from a public-domain chart based on a 1520 woodcut, including its original printed numbers. Each drawing isolates one place-value group; it does not show the complete combined pose for a multi-place number. Absent places are omitted; no independent historical zero sign is supplied. The converter covers 1–9,999: Bede’s larger values require hand positions on the torso and thighs. Later diagrams and Fibonacci’s arrangement should not be silently mixed with this variant.

History

Bede opened De temporum ratione in 725 with instructions for numerical hand positions before explaining calendars and the computation of Easter. His account preserves an older Mediterranean tradition. Medieval authors transmitted and modified these positions; Fibonacci’s later placement of hundreds and thousands differs from Bede’s.

How to read it

The little, ring, and middle fingers on the left encode 1–9; its thumb and index encode 10–90. On the right, the thumb and index repeat the tens shapes for 100–900, while the other three fingers repeat the units shapes for 1,000–9,000. Combine the groups simultaneously. The 1520 woodcut shows each place-value group separately. Left and right refer to the signer; combine the groups on each hand.

  1. Identify the signer’s left hand: its three outer fingers supply units, and its thumb/index supply tens.
  2. Distinguish fingertips touching the middle of the palm (1–6) from the base of the palm (7–9).
  3. Read the right thumb/index as hundreds and the right outer fingers as thousands. This is Bede’s ordering.
  4. Add the four contributions. For 1,254: right hand 1,000 + 200, left hand 50 + 4.

Limits

The illustrations are copied from a public-domain chart based on a 1520 woodcut, including its original printed numbers. Each drawing isolates one place-value group; it does not show the complete combined pose for a multi-place number. Absent places are omitted; no independent historical zero sign is supplied. The converter covers 1–9,999: Bede’s larger values require hand positions on the torso and thighs. Later diagrams and Fibonacci’s arrangement should not be silently mixed with this variant.

Compare systems